[01] Practical = 20
[02] Question = 1- 72 (Class-01-15) = 60
http://mcqhelps.blogspot.com/
[03] Interview = Viva = 20
===============================================
ইলাস্ট্রেটর র্যাক্ট্যাঙ্গল গ্রিড টুল – Rectangular Grid Tool
Rectangular গ্রিড টুল মূলত টেবিল টাইপের মতো গ্রিড তৈরি করে নিতে পারি । আমরা লাইন টুল দিয়েও টেবিল তৈরি করে নিতে পারি, সেক্ষেত্রে বেশ সময় লাগবে । আমরা যদি টুলবক্স থেকে Rectangular Grid Tool সিলেক্ট করে ড্রগ করি তাহলে টেবিল আকৃতির মতো গ্রিড তৈরি হবে । চলুন নিচের অংশে দেখে নেই কিভাবে Rectangular Grid Tool ব্যবহার করতে হয়, তা দেখে নেই ।

Rectangular Grid Tool টুল ব্যবহার করে জন্য ইলাস্ট্রেটর টুলবক্স থেকে Rectangular Grid Tool সিলেক্ট করে নিন । ঠিক উপরের ছবির মতো ।
সিলেক্ট করার পর ক্যানভাসে ড্রয়িং করুন । দেখবেন নিচের ছবির মতো দেখা যাবে ।

উপরের ছবিতে দেখুন । সেখানে টেবিল তৈরি হয়েছে । এখন আপনি যদি টেবিল হেডার তৈরি করতে চান, তাহলে টুলবক্স থেকে Shape Builder Tool সিলেক্ট করে নিয়ে টেবিলের যে অংশ টুকু হেডার বা দিবেন সেই অংশে টুকু Shape Builder Tool থাকা অবস্থায় ড্রয় করুন । দেখবেন আপনার টেবিলে হেডিং তৈরি হবে ।
ইলাস্ট্রেটর পুলার গ্রিড টুল – Polar Grid Tool
Polar Grid Tool দিও আপনি গ্রিড তৈরি করতে পারবেন । তবে এই গ্রিডটি হবে গোলা আকৃতির । চলুন নিচের অংশে দেখে Polar Grid Tool এর ব্যবহার ।
Polar Grid Tool ব্যবহার করার জন্য Illustrator এর টুলবক্স থেকে Polar Grid Tool টুল সিলেক্ট করে নিন । ঠিক নিচের ছবির মতো ।

Polar Grid Tool টুল সিলেক্ট করে নেবার পর যেকোন অবজেক্টের উপর ড্রয় করুন । দেখবেন নিচের ছবির মতো কার্ভ তৈরি হবে ।

উপরের ছবিতে দেখুন । সেখানে গোল আকার গ্রিড তৈরি হবে। আবার ড্রগ করা অবস্থায় কিবোর্ড থেকে Up Arrow, Down Arrow, Left Arrow এবং Right Arrow কি প্রেস করে ইচ্ছা মতো গ্রিড বাড়াতে পারবেন ।
Polar Grid Tool টুল এর ব্যবহার
আপনি Polar গ্রিড টুল এর সাহায্যে গ্রিড তৈরি করে নিয়ে গ্রিডে পরিমান কম বেশি এবং গ্রিডে দেওয়া, সাইজ পরিবর্তন করতে পারেন । আমি নিচের গ্রিড ব্যবহার আলোচনা করবো ।

উপরের ছবিতে দেখুন । সেখানে একটি গ্রিড তৈরি করা হয়েছে । সেই গ্রিডের স্ট্রোক কালার এবং স্ট্রোক সাইজ পরিবর্তন করবো । সেটি করার জন্য গ্রিড সিলেক্ট থাকা অবস্থায় মেনু বারের নিচের দিকে অপশন বার থেকে কালার চেঞ্জ, স্ট্রোক সাইজ, শেপ অ্যাড করতে পারবেন ।

উপরের ছবিতে দেখুন । অপশন বারের বাম পাশে স্ট্রোক কালারে ক্লিক করলে, সেখানে বেশ কিছু কালার অ্যাড হবে । সেখান থেকে কালার নির্বাচন করতে পারবেন আবার স্ট্রোক সাইজ বাড়ানোর জন্য উপরের ডান পাশে লাল দাগ করা Stroke লেখাতে ক্লিক করে স্ট্রোক সাইজ পরিবর্তন করে নিতে পারবেন ।
শেপ অ্যাড করার নিয়ম

শেপ অ্যাড করার জন্য গ্রিড সিলেক্ট থাকা অবস্থায় অবশন বার থেকে উপরের লাল দাগ করা শেপের ঘরে ক্লিক করুন । দেখবেন সেখানে বেশ কিছু শেপ বের হবে । সেখান থেকে আপনার পছন্দ অনুসারে শেপ অ্যাড করে নিতে পারবেন ।
শেপ সিলেক্ট করার পর উপরের গ্রিডের নিচের দিকে পরিবর্তন হয়েছে । আপনার ক্ষেত্রে অন্য ভাবেও হতে পারে । আপনি উপরের নিয়ম অনুসারে Spiral Tool, Rectangular Grid Tool কালার পরিবর্তন, সাইজ পরিবর্তন সহ বেশ কিছু স্টাইল অ্যাড করে নিতে পারবেন ।
How to Make a Grid in Illustrator
What You'll Learn in This Grid Illustrator Tutorial
- How to create a grid in Illustrator using the Rectangular Grid Tool
- How to make a grid in Illustrator using the Polar Grid Tool
- How to change the grid size in Illustrator
- How to edit a grid in Illustrator
1. How to Use the Grid Tools in Adobe Illustrator
Use the Rectangular Grid Tool to create rectangular grids or the Polar Grid Tool to create polar grids in Illustrator.
To select one of these two tools, click and hold the Line Segment Tool from your toolbar. If you can't see those tools, you need to go to Window > Toolbars > Advanced. Once you've selected them, let's see how you can use these tools to make a grid in Illustrator.

2. How to Create a Rectangular Grid in Adobe Illustrator
Step 1
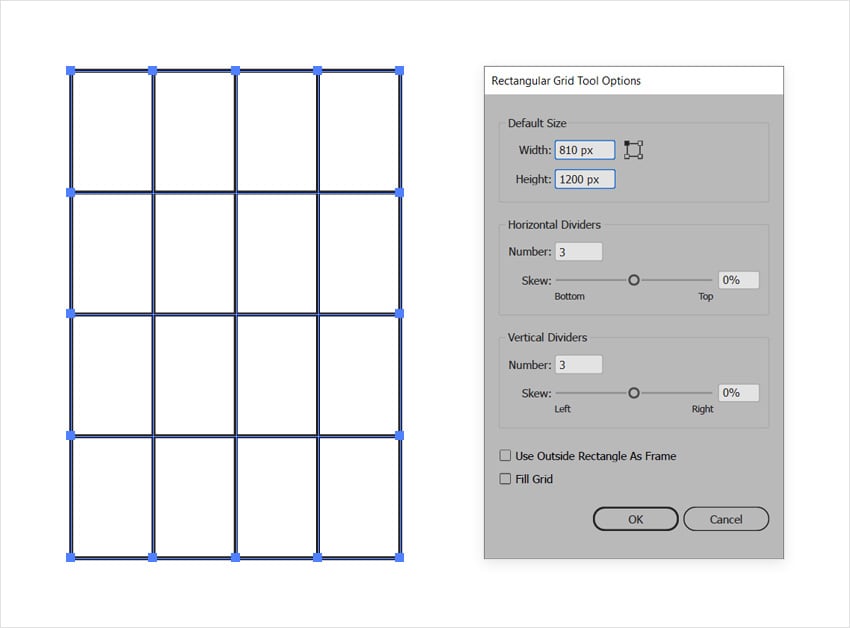
You can either double-click the Rectangular Grid Tool or just select it and click on your artboard to open the Rectangular Grid Tool Options window, where you can set the settings for the grid that you're about to create.
Use the Width and Height settings to set the size of your grid. Using one of those four reference points, you can set the point from which your grid will be drawn.
Step 2
Use the Number input box from the Horizontal Dividers section to set the number of horizontal lines that will appear between the top and bottom grid lines.
Use the Number input box from the Vertical Dividers section to set the number of vertical lines that will appear between the leftmost and rightmost grid lines.

Step 3
Use the Skew slider from the Horizontal Dividers section to set how your horizontal lines are weighted toward the top or bottom of the grid.
Use the Skew slider from the Vertical Dividers section to set how your vertical lines are weighted to the left or right edge.

Step 4
Check the Use Outside Rectangle As Frame box to unite the top, bottom, left, and right grid lines into a single rectangle.

Step 5
Check the Fill Grid box to fill your new grid with the active fill color.

Step 6
Alternatively, you can select the Rectangular Grid Tool and simply click and drag to create a grid in Illustrator. It can be a much easier method to edit the grid size in Illustrator.
Before you release the mouse button to create the grid, you can press the up/down arrow buttons to increase/decrease the number of horizontal lines in your rectangular grid, or the left/right arrow buttons to increase/decrease the number of vertical lines in your rectangular grid.

3. How to Create a Polar Grid in Adobe Illustrator
Step 1
As with the Rectangular Grid Tool, you can either double-click the Polar Grid Tool or just select it and click on your artboard to open the Polar Grid Tool Options window, where you can set the settings for the grid that you're about to create.
Use the Width and Height settings to set the size of your grid. Using one of those four reference points, you can set the point from which your grid will be drawn.

Step 2
Use the Number input box from the Concentric Dividers section to set the number of concentric circles that you want to add besides the main one.
Use the Number input box from the Radial Dividers section to set the number of straight lines that you want to add between the center and the edge of the grid.

Step 3
Use the Skew slider from the Concentric Dividers section to set how your concentric circles are weighted toward the inside or the outside of the grid.
Use the Skew slider from the Radial Dividers section to set how your straight lines are weighted counterclockwise or clockwise in the grid.

Step 4
Check Create Compound Path From Ellipses to convert the concentric circles into a single compound path.

Step 5
Check the Fill Grid box to fill your radial grid with the active fill color.

Uncheck the Create Compound Path From Ellipses box to fill all the circles with the active fill color.

Step 6
Alternatively, you can select the Polar Grid Tool and simply click and drag to draw a grid in Illustrator.
Before you release the mouse button to create the grid, you can press the up/down arrow buttons to increase/decrease the number of concentric circles in your polar grid, or the left/right arrow buttons to decrease/increase the number of radial dividers in your polar grid.


No comments:
Post a Comment