Object menu In Illustrator
Object Menu
The Object menu has been designed in illustrator to perform on your object only. It has many effective functions to perform and control your graphics. Some of these are used most of the time by the professional to create stunning design of effect.
We are going to discuss here about the basic guide of object menu in illustrator, this tutorial will surely help you so let’s start.
Transform
This function allow you to make transform of you vector at any angle and position. There are given appropriate option to perform by changing the value of their properties.
Arrange
It works as the name of function; this function will help you to put the right position of your vector like front, back, forward and backward of another object.
Group
The group function is used to make grouping of more than one object and vector, the whole design can be moved after applied group option.
Ungroup
The work of ungroup function is opposite of group function. If you have grouped the whole design and you required to change a particular part of the design. At this time you need to apply ungroup option then modify.
Lock
The lock function is given for lock any picture, vector and object. After locking, It will not take any command and effect unless apply unlock option.
Unlock
The unlock function is used to unlock the locked picture, vector and object. After unlock, it will be available for modifications.
Hide
The hide function is given in illustrator for hide any vector on the canvas as you don’t required yet. The present of some vector shapes disturb to work on a separate figure so we apply this function.
Show All
The show all function is applied when you want to visible all the hidden vector and graphics on whole canvas.
Expand
The expand function is very interesting and powerful in Illustrator. It is used to apply when you want to expand the size of figure and line art. It cannot be applied on every figure because it has limitation to perform.
Expand Appearance
The expand appearance function in illustrator allow you to apply on a special effect like gradient, filter and 3D etc. It makes the segment in the effect and allows you to perform on separate point of effect.
Rasterize
The rasterize function is given in illustrator for converting vector object to pixels. After rasterized, you get the limited by the number of pixels per square inch so you get the poor quality of graphics during scale.
Create Gradient Mesh
The gradient mesh function is given in illustrator for use of apply separate gradient effect on a single point of graphic. As you apply this function, you get a mesh with some anchor point on the figure and you have to perform by using them.
Create Object Mosaic
The Create Object Mosaicfunction is given in Illustrator for use make unique settings for selected graphic. It will help you to make different appearance of vector graphics by adjust the settings in pop up.
Flatten Transparency
The Flatten Transparency is given in the illustrator for enhance the quality of effect during print process. As you applied the effects on the object, it may not print correctly and reduce the quality of printout.
Slice
The slice function is given in the illustrator for make a slice of a selected object. It allows you to slice any part of object and it also applied by “Slice Tool”. It has also a dialog box and there are given different option to make it more capable to perform.
Create Trim Marks
The create trim marks function is given in the illustrator for make a mark around the object to guide the print operator to cut the area. It provides the exact and sharp edge of object to cut right position.
Path
This path function is given in illustrator for work on selected path such a line, brush line, pencil line, pen line and etc. It provides best result and effect on whole selected path and anchor point.
Pattern
The pattern function is given in the illustrator for use to make, edit and apply unique settings of pattern on document. You can convert any object and vector as a pattern by adjusting the settings in Pattern Options palette.
Blend
The blend function is given in the illustrator for apply different blend effect of on the selected path. It makes the sequence of colors and figure in between selected objects. You can adjust their position and number of figure by using blend settings.
Envelope distort
The Envelope Distort function is given in the illustrator for wrap the figure and text. It will help you to modify the figure into different shape and angle. It is having some more powerful extra function in the dialog box.
Perspective
The perspective function is given in the illustrator for create a 3D grid line, 3D shape in Perspective View. There are given three options in the dialog box to perform different way.
Live Paint
The live paint function is given in the illustrator for fill color in the separate area in overlapped figure of sectors that has been create by go to object menu > Live Paint > Make. The artwork will divided into separate and available to fill color freely in them by the use of “Live Paint Bucket Tool”.
Image Trace
The image trace function is given in the illustrator for convert raster images to vector. It is used to make easy task of tracing the artwork to get fresh new one.
Text Wrap
The text wrap function is given in the illustrator for use to wrap the text paragraph around the figure. You can adjust the space between figure and text by the help of “Text wrap Option”.
Clipping Mask
The clipping mast function is given in the illustrator to make a masking on the picture and object. It is applied by using paths that can help you to select perfect area on the object to visible correctly.
Compound Path
The compound path function is given in the illustrator to use when you need a hole and remove space inside the object with interact by another shape. You can apply more than one figure to make cut with interact shape but which figure you want to cut that should be below from all of them.
Artboard
The artboard is given in the illustrator to perform your creativity by vector graphic. It is just like a painter’s board where you draw vector, painting and effect by using some tools. You can take more than one artwork as you are suitable to work.
Graph
The graph function is given in the illustrator for apply different type of graph and customize also on the canvas. It has given some extra features to manipulate the graph presentation like shadow, angle and type etc
অ্যাডোবি ইলাস্ট্রেটর রিফ্লেক্ট টুল এর ব্যবহার – Reflect Tool 24
Reflect Tool ব্যবহার করে শেপ তৈরি করে আবার একই ধরনের শেপ অন্য সাইটেও তৈরি করা যায় । যেমন ধরুন, আপনি পেন টুল ব্যবহার করে ফুলের অর্ধেক সাইট তৈরি করলেন, এবার আপনি ইলাস্ট্রেটর টুলবক্স থেকে Reflect Tool ব্যবহার করে একই ধরনের শেপ অন্য সাইটেও তৈরি করে নিতে পারবেন । চলুন তাহলে নিচের অংশে দেখে নেই ।
রিফ্লেক্ট টুল – Reflect Tool
এবার অ্যাডোবি ইলাস্ট্রেটর এর টুলবক্স থেকে Reflect Tool সিলেক্ট করে নিন । ঠিক নিচের ছবিটির মতো,

আমি আমার ক্ষেত্রে নিচের ছবি ব্যবহার করে আলোচনা করবো । নিচের ছবিতে দেখুন । সেখানে পেন টুল দিয়ে শেপের অর্ধেক তৈরি করা হয়েছে । এবার আমি Reflect Tool এর সাহায্যে নিচের শেপের অন্য সাইটিও তৈরি করে নিবো । অন্য সাইটে একই ধরনের শেপ তৈরি করা জন্য শেপটি সিলেক্ট করে নিন ।

শেপ সিলেক্ট করার পর Reflect Tool সিলেক্ট থাকা অবস্থায় শেপ টি যে পাশে নিবেন, সেই পাশে একটি পয়েন্ট দিয়ে দিন ।
পয়েন্ট দেওয়া হয়ে গেলে, Reflect Tool আইকনের উপর ডাবল ক্লিক করুন । দেখবেন নিচের ছবির মতো উইন্ডো বের হবে ।

উপরের ছবিতে দেখুন । সেখানে Horizontal এবং Vertical অপশন রয়েছে, এবার আপনার তৈরি করা শেপটি কোন পাশে বসাবেন, লম্বালম্বি ভাবে না অনুভুমিক ভাবে সেটি উপরের অপশন থেকে সিলেক্ট করে দিন ।
আমার ক্ষেত্রে Vertical সিলেক্ট করে Copy লেখাতে ক্লিক করেছি। ক্লিক করার পর একই ধরনের শেপ অন্য সাইটে তৈরি হয়েছে। যা দেখতে নিচের মতো । আপনার ক্ষেত্রে অন্যও হতে পারে ।

উপরের ছবিতে দেখুন । সেখানে একই ধরনের শেপ দুই পাশে তৈরি হয়েছে । উপরের নিয়ম অনুসারে আপনি একই ধরনের শেপ তৈরি করে নিতে পারবেন
Rotate objects
Rotating an object turns it around a fixed point that you designate. The default reference point is the object’s center point. If you have multiple objects in a selection, the objects will rotate around a single reference point, which is the center point of the selection or bounding box by default. To rotate each object around its own center point, use the Transform Each command.
Rotate an object using the bounding box
Select one or more objects.
With the Selection tool
 , move the pointer outside the bounding box and near a bounding box handle so that the pointer changes to
  , and then drag.
Rotate an object with the Free Transform tool
Select one or more objects.
Select the Free Transform tool
 .
.Position the pointer anywhere outside the bounding box so that the pointer changes to
, and then drag.
Rotate an object with the Rotate tool
Select one or more objects.
Select the Rotate tool
 .
.Do any of the following:
To rotate the object around its center point, drag in a circular motion anywhere in the document window.
To rotate the object around a different reference point, click once anywhere in the document window to reposition the reference point. Then move the pointer away from the reference point and drag in a circular motion.
To rotate a copy of the object instead of the object itself, hold down Alt (Windows) or Option (Mac OS) after you start to drag.
For finer control, drag farther from the object’s reference point.
Rotate an object by a specific angle
You can control the exact angle of rotation with the Rotate command.
Select one or more objects.
Do one of the following:
To rotate around a different reference point, select the Rotate tool. Then Alt‑click (Windows) or Option‑click (Mac OS) where you want the reference point to be in the document window.
To rotate around the center point, choose Object > Transform > Rotate, or double-click the Rotate tool.
Enter the rotation angle in the Angle text box. Enter a negative angle to rotate the object clockwise; enter a positive angle to rotate the object counterclockwise.
If the objects contain a pattern fill, select Patterns to rotate the pattern. Deselect Objects if you want to rotate the pattern but not the objects.
Click OK, or click Copy to scale a copy of the objects.
Note:To place multiple copies of the object in a circular pattern around a reference point, move the reference point away from the center of the object, click Copy, and then repeatedly choose Object > Transform > Transform Again.
Rotate an object with the Transform panel
Select one or more objects.
Do one of the following:
To rotate the object around its center point, enter a value for the Angle option in the panel.
To rotate the object around a different reference point, click a white square on the reference point locator
 in the panel, and enter a value for the Angle option.
Tip: You can also call up the Transform panel by clicking X, Y, W, or H in the Control panel.
You can rotate a symbol around its registration point, using the Transform panel. For more information see Symbol registration point.
Rotate multiple objects individually
Select the objects to rotate.
Choose Object > Transform > Transform Each.
Do either of the following in the Rotate section of the dialog box:
Click the angle icon or drag the angle line around the icon.
In the Angle text box, enter an angle between –360° and 360°.
Click OK, or click Copy to rotate a copy of each object.
Rotate the x and y axes of a document
By default, the x and y axes are parallel to the horizontal and vertical sides of the document window.
Choose Edit > Preferences > General (Windows) or Illustrator > Preferences > General (Mac OS).
Specify an angle in the Constrain Angle text box. A positive angle rotates the axes counterclockwise; a negative angle rotates the axes clockwise.
Rotating the axes is useful if your artwork consists of elements that are rotated to the same angle, such as a logo and text displayed on a 20° angle. Instead of rotating each element you add to the logo, you can simply rotate the axes by 20°. Everything you draw is created along the new axes.

Object aligned with default axes (left) compared to alignment with axes rotated 20° (right) The following objects and actions are not affected by the new axes:
Objects that already exist
Rotating and blending
Drawing with the Pencil or Live Trace tool
Reflect or flip objects
Reflecting an object flips the object across an invisible axis that you specify. You can reflect objects using the Free Transform tool, the Reflect tool, or the Reflect command. If you want to specify an axis from which to reflect, use the Reflect tool.
To create a mirror image of an object, you can copy while reflecting.
Reflect an object with the Free Transform tool
Select the object to reflect.
Select the Free Transform tool
.Do one of the following:
Drag a handle of the bounding box past the opposite edge or handle until the object is at the desired level of reflection.
To maintain the object’s proportions, hold down Shift while dragging a corner handle past the opposite handle.
Reflect an object with the Reflect tool
Select the object.
Select the Reflect tool
 .
.To draw the invisible axis across which you want the object to reflect, click anywhere in the document window to set one point of the axis. The pointer changes to an arrowhead.
Position the pointer at another point to define the invisible axis, and do one of the following:
Click to set the second point of the invisible axis. When you click, the selected object flips over the defined axis.

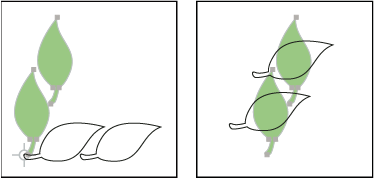
Click to set one point of the axis (left), then click again to set the other axis point and reflect the object across the axis (right). To reflect a copy of the object, hold down Alt (Windows) or Option (Mac OS) and click to set the second point of the invisible axis.
Adjust the axis of reflection by dragging instead of clicking. Shift‑drag to constrain the angle by 45°. As you drag, the invisible axis of reflection rotates around the point you clicked in step 3 and an outline of the object appears reflected. When the outline is in the desired position, release the mouse button.

Dragging the second point of the reflect axis to rotate the axis
For finer control, drag farther from the object’s reference point.
Reflect by specifying an axis
Select the object to reflect.
To reflect the object around the object’s center point, choose Object > Transform > Reflect or double-click the Reflect tool
.To reflect the object around a different reference point, Alt‑click (Windows) or Option‑click (Mac OS) anywhere in the document window.
In the Reflect dialog box, select the axis across which you want the object to be reflected. You can reflect an object across a horizontal, a vertical, or an angled axis.
If the object contains patterns and you want to reflect the patterns, select Patterns. (To reflect only the patterns, deselect Objects.)
To preview the effect before you apply it, select Preview.
Do one of the following:
To reflect the object, click OK.
To reflect a copy of the object, click Copy.
Painting and Transforming
SL/No Shortcut Function 1 Alt Eyedropper tool from Live Paint Bucket tool 2 Shift Samples intermediate color from gradient, picture, etc. with eyedropper 3 Alt Tool Sets center point and shows dialog 4 Alt+drag Duplicates and transforms selection 5 Tilde(~)+drag Transform pattern without transforming object 6 Shift+drag bounding box Scale proportionally with Selection tool 7 Alt+drag bounding box Scale from center with Selection tool 8 Shift+drag Move mesh point along path with Mesh tool 9 Shift Add mesh point with Mesh tool without changing color 10 Alt Remove mesh point with Mesh tool

No comments:
Post a Comment